I received this little jewel in my inbox a few days ago, and feel I must share it with you.
I hope you enjoy this recipe...
"Take twelve whole months,
Clean them thoroughly of all bitterness, hate, and jealousy,
Make them just as fresh and clean as possible.
Now cut each month into twenty-eight, thirty, or thirty-one different parts,
but don't make up the whole batch at once.
Prepare it one day at a time out of these ingredients.
Mix well into each day -
one part of faith, one part of patience, one part of courage, and one part of work.
Add to each day one part of hope, faithfulness, generosity, and kindness.
Blend with one part prayer, one part meditation, and one good deed.
Season the whole with a dash of good spirits, a sprinkle of fun, a pinch of play, and a cupful of good humor.
Pour all of this into a vessel of love.
Cook thoroughly over radiant joy, garnish with a smile,
and serve with quietness, unselfishness, and cheerfulness.
You're bound to have a happy new year."
As we step over the threshold into the new decade, I wish all of you faith, health and joy!
XOX
Zara
31 December 2010
22 December 2010
Stash Therapy
I've been away for a bit.
Yummy Hubby and I have just returned from a trip to the Island Nation. We booked our tickets originally intending a short little holiday before Christmas, but as timing would have it, a large portion of our trip was spent visiting an aunt in hospital. Poor Aunty has been ill for some time, but happened to have a major relapse while we were there.
If you don't already know this, hospitals and illness can be extremely trying, both physically and emotionally.
Draining. Exhausting. Frustrating.
And sad.
Thankfully, I have an amazing husband who insisted on pulling me away from gloomy waiting rooms and sombre relatives (not to mention needles, blood and guts) every chance he could, so all in all we did manage to steal a fair amount of time and salvage whatever we could out of our little 'holiday'.
We even managed to squeeze in a visit to the much acclaimed Marina Bay Sands (no pics unfortunately). I'm not much into buildings, but I found this one really unique and surprisingly calming to my tired eyes and mind. The view from the observation deck at the top (at nightfall) was also worth the SGD20 I paid.
But anyway, as every quilter's husband would know, the one thing that can surely cheer a quilter up would be - stash! So one afternoon Yummy Hubby dragged me to Arab Street in the Muslim Quarter where I spent a couple of happy hours browsing the many, many selection of fabric on display, while he waited patiently, always nearby. Bless him.
And what do we women do best when they're down?
Besides eating chocolate? (although copious amounts were consumed, thanks to the 7-11 just next to our hotel)
Why, SHOP! of course, and so I came away with these delicious prints, mmmmm....:

With Molly striking a pose:

Not forgetting Milo, getting into some of the action:

And my favourite of the lot, wee little trains, adorable!

I haven't any idea what I'll be making (ideas and suggestions always welcome), so I'll just add them to my stash for now.
Hope everyone's having a happy and HEALTHY week.
XOX
PS. I've been meaning to mention that Cottage Patch in Ampang is having a sale till the end of the month - all fabric is 20% off, so you may want to stock up, or should I say "stash up", if you're in the area. Just so you know where to go for therapy.
15 December 2010
A Quick Fix
Ever had times when you just need a quick fix when it comes to sewing/quilting?
You want to start on something new, your hands are itching to stitch, but at the same time you haven't the time/energy/creativity for anything too complicated.
Also, you've had enough of your scraps and can't be asked to think of a creative way to piece them together into something decent.
Well then, I ask, what better way of tackling such times than to use a panel?
Panels are lovely, easy things to work with. As an added bonus, it's provides material for a quick project too.
And so I dove into my stash and pulled out one of the few panels which I've been hoarding ... Sweet Strawberry Shortcake...

Add a couple of borders: a light pistachio green solid for the inner border, and an oh-so-sweet pink and white polka-dot fabric for the outer border.
Next , layer and quilt : Another quick and easy process, just straight lines outlining the existing lines in the panel and on the borders I added. The centre is quilted with random spirals and hearts. Note : I have to point out (because you can't see it in the picture) that my spirals didn't turn out as circular as I would have liked them... a tribute to an amateur's free motion skills!
I forgot to take a photo of the back, but if you're curious, I chose a solid lemon fabric, which I think gives a nice, lively contrast to the quilt top.

 This baby quilt finished a little larger than my usual, at 45" X 54".
Zara finished feeling accomplished, satisfied and happy :-)
You want to start on something new, your hands are itching to stitch, but at the same time you haven't the time/energy/creativity for anything too complicated.
Also, you've had enough of your scraps and can't be asked to think of a creative way to piece them together into something decent.
Well then, I ask, what better way of tackling such times than to use a panel?
Panels are lovely, easy things to work with. As an added bonus, it's provides material for a quick project too.
And so I dove into my stash and pulled out one of the few panels which I've been hoarding ... Sweet Strawberry Shortcake...

Add a couple of borders: a light pistachio green solid for the inner border, and an oh-so-sweet pink and white polka-dot fabric for the outer border.
Next , layer and quilt : Another quick and easy process, just straight lines outlining the existing lines in the panel and on the borders I added. The centre is quilted with random spirals and hearts. Note : I have to point out (because you can't see it in the picture) that my spirals didn't turn out as circular as I would have liked them... a tribute to an amateur's free motion skills!
I forgot to take a photo of the back, but if you're curious, I chose a solid lemon fabric, which I think gives a nice, lively contrast to the quilt top.

My favourite part of this particular Fix is the binding. I used a cute green and pink combo (I think this is from Moda's Sent with Love line) and I love the way it frames and adds a Zing! to the finished quilt.

Zara finished feeling accomplished, satisfied and happy :-)
12 December 2010
Prayer Quilt
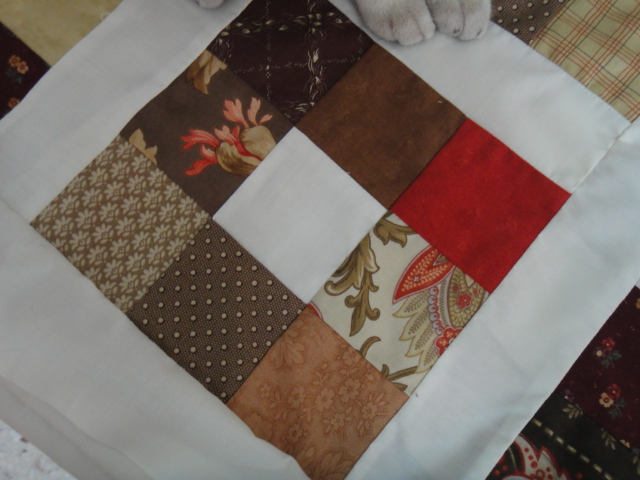
As promised, a quilt made using charms. ONE charm pack, believe it or not. I used charms from Moda's Blush line, and the background (and backing) is a solid grey fabric.

Once I had the pattern in my head, the whole quilt came together easily enough. And, I have to say I had real fun quilting this one. I experimented with different quilt designs on this top, and had a mixture of stipple and straight lines.

The quilting is more apparent from the back, as you can see. Far from perfect though...

Because only one charm pack was used, the resulting quilt is rather small (about 2.5 feet X 3.5 feet). On the upside, its a perfectly sized prayer rug.

Of course, a bigger quilt can always be achieved by adding more charms into the pattern.

What can you make out of a charm pack?

Once I had the pattern in my head, the whole quilt came together easily enough. And, I have to say I had real fun quilting this one. I experimented with different quilt designs on this top, and had a mixture of stipple and straight lines.


Because only one charm pack was used, the resulting quilt is rather small (about 2.5 feet X 3.5 feet). On the upside, its a perfectly sized prayer rug.

Of course, a bigger quilt can always be achieved by adding more charms into the pattern.

What can you make out of a charm pack?
08 December 2010
Back to School...
Well, not quite, but well on the way...
I've been busy keeping my promise to Milo. Unfortunately I've only managed to make 3 pencil cases. And I spent the weekend learning that I'm still hopeless when it comes to making anything with zips attached :-(
However, and more importantly, these were made with lots of patience and thought.

As you can see, I've attempted to make up for my sewing shortcomings by adding 'embellishments' in the shape of pencils, coloured pencils and erasers. I hope that's not cheating?
I did take a picture of the 3 cases by themselves, but (knowing how 'clever' I am with the camera and computer combined) managed to delete (or misplace?) the photo before I got to upload it.
I'm also throwing in a tote, which can be used for carrying stuff around for activities. The tote was actually made (and posted about ) much earlier. I hope that's not cheating either...?

This bundle will be off to the Poslaju office tomorrow, hope I can squeeze in the time. Auntie Ayu, here we come!
03 December 2010
Freak Friday - Charms
I bet you don't know that I'm a charm pack freak.
I have plenty of them. I just luuurve them. The problem is, I tend to not use them :-(
Because they look so adorable just the way they are :-)
So, I'm telling myself, I'm going to use one or two for my next quilt project. Don't know what it is yet, it'll be a surprise to me and you both!
I'm also putting a few of them up for sale, for other charm freaks:


I can fit up to 2 packs in a RM3.50 Pos Express envelope for shipping within Malaysia.
How's Friday for you so far?
I have plenty of them. I just luuurve them. The problem is, I tend to not use them :-(
Because they look so adorable just the way they are :-)
So, I'm telling myself, I'm going to use one or two for my next quilt project. Don't know what it is yet, it'll be a surprise to me and you both!
I'm also putting a few of them up for sale, for other charm freaks:

Moda - Saltbox Harvest
42 5" squares
Price : RM38
Item condition : New
Status : Available

Moda - It's a Hoot by Momo
42 5" squares
Price : RM38
Item condition : New
Status : Available

Moda - Boutique by Chez Moi
42 5" squares
Price : RM38
Item condition : New
Status : Available

Moda Collections for a Cause - Charity
42 5" squares
Price : RM38
Item condition : New
Status : Available
I can fit up to 2 packs in a RM3.50 Pos Express envelope for shipping within Malaysia.
How's Friday for you so far?
01 December 2010
Strippy Project Finished!
My, I've been productive, heh heh.
I've finished with my earth-toned strips, and here are the results.

I must say I'm really happy with how it's turned out. I've not quilted this piece, mind you, I've simply stitched on a layer of backing under the pieced top.

The finished table cloth measures about 5 ft square. There are 5 rows of blocks, each row consisting of 5 blocks. An off-white sashing was sewn in between each block, and the entire piece finished off with a 2" deep russet border all around.
My old kitchen table feels all new now :-)

There were even enough blocks leftover to make into a mini table cloth. This one has 3 rows of 3 blocks, and as with the kitchen table cloth, is also finished with the cream sashing and russet border.

Molly seems to like these strips, she seemed to be drawn to them from the beginning to the end of the Project. She insisted on 'modelling' the mini table cloth and kept getting into the frame when I tried to take these pictures.
Overall, this was quite an easy one to do. And the results are so satisfying. I hope you try it too!
30 November 2010
Tis the Season For Giving
Meow! Milo here...
I heard Human Mummy say there's a charity project on organized by Pondok Craft. (see this link for more details : http://www.pondokcraft.blogspot.com/).
Apparently Auntie Ayu (the pretty lady from Pondok Craft) is calling on crafters to make back-to-school items, which will then be distributed to orphanages. Human Mummy says little children live in the orphanages, and they don't have mummies and daddies to buy them things for school. She also says that's why we have to join the charity, to let the abangs and kakaks there will know that there is plenty of love for them.
I think this is a fabulous idea, and I can tell you, am SO excited to help out.

I hope Human Mummy will get started soon. If you see her could you please tell her to let me into her sewing room to help?
I heard Human Mummy say there's a charity project on organized by Pondok Craft. (see this link for more details : http://www.pondokcraft.blogspot.com/).
Apparently Auntie Ayu (the pretty lady from Pondok Craft) is calling on crafters to make back-to-school items, which will then be distributed to orphanages. Human Mummy says little children live in the orphanages, and they don't have mummies and daddies to buy them things for school. She also says that's why we have to join the charity, to let the abangs and kakaks there will know that there is plenty of love for them.
I think this is a fabulous idea, and I can tell you, am SO excited to help out.
Human Mummy says she is going to try to make pencil cases, coin purses, gym bags... I think she's getting carried away a bit ehehheh.
Did I mention how excited I am?
* abang - Malay meaning elder brother
kakak - elder sister
28 November 2010
Strippy Fun!
I've been having fun with strips of fabric. Strips are cut from odd bits of fabric, but not so small so as to be scraps. A variety of fabric is chosen. I gave up trying to match them after a while. There doesn't really have to be a theme, although I've made mine to consist mostly of earth tones.
Most of these strips were cut along the width of fabric, and are about 3 inches wide.

Strips are then pieced together randomly to make several nine patch blocks, each block having a cream/off-white centre block, and enclosed in a matching cream border, like so:

Each finished block (minus the border) is 7.5 inches. So far I've made about 30 of these blocks now. I'm going to make a much needed new tablecloth for the kitchen table.
More pictures soon!
 |
| Can anyone spot Molly's foot? |

Strips are then pieced together randomly to make several nine patch blocks, each block having a cream/off-white centre block, and enclosed in a matching cream border, like so:

Each finished block (minus the border) is 7.5 inches. So far I've made about 30 of these blocks now. I'm going to make a much needed new tablecloth for the kitchen table.
 |
| Molly interfering again! |
22 November 2010
Coasters
As I sew I have a habit of chucking small bits and pieces of leftover fabric into a box. (It's sooo difficult to throw them away isn't it?) Well, the box will inevitably overflow at some point, so once in a while I go through it and try to make something out of the contents.
This time I came up with coasters. I got the idea at the office one day. I was trying hard to concentrate on work, but got constantly distracted by a sticky ring on my desk from where my coffee cup had been the previous day.
These coasters are really simple to make. Which is really great, given my schedule these days. All you need is two squares, 4" or 5" squares work wonderfully, and one square of batting.

So what you do is place the front and back pieces together (with right sides facing) on top of the square of batting. Like in the (blurry) photo below.
 Line everything up and stitch with a 1/4 inch seam allowance along the edge, leaving about a 2 inch gap (for turning) between your starting point and stopping point. Trim away excess batting and trim the corners to reduce bulk.

Using the opening you left earlier, turn everything inside out. Quilt as desired. Don't forget to quilt over the gap to close it. I used simple straight line quilting in my coaster here.


You can also make them out of smaller pieces of scraps, like I did. Just piece enough of them together to get the desired (4" or 5" square) size, and repeating the steps above.

I love just mixing the fabric and colour randomly. That way when you flip the coaster over it's like you get a totally new one!

These babies are going to the office with me. Let's see if I can make enough for my colleagues too.
Wishing you a good week ahead!
This time I came up with coasters. I got the idea at the office one day. I was trying hard to concentrate on work, but got constantly distracted by a sticky ring on my desk from where my coffee cup had been the previous day.
These coasters are really simple to make. Which is really great, given my schedule these days. All you need is two squares, 4" or 5" squares work wonderfully, and one square of batting.

So what you do is place the front and back pieces together (with right sides facing) on top of the square of batting. Like in the (blurry) photo below.


Using the opening you left earlier, turn everything inside out. Quilt as desired. Don't forget to quilt over the gap to close it. I used simple straight line quilting in my coaster here.


You can also make them out of smaller pieces of scraps, like I did. Just piece enough of them together to get the desired (4" or 5" square) size, and repeating the steps above.

I love just mixing the fabric and colour randomly. That way when you flip the coaster over it's like you get a totally new one!

These babies are going to the office with me. Let's see if I can make enough for my colleagues too.
Wishing you a good week ahead!
20 November 2010
Something a Little Different
Let me start by wishing all my Moslem friends a belated happy and blessed Eidul Adha and all my Hindu friends a belated Happy Diwali. Hope you guys had a good one.
It's still terrible at the office, but am happy to report that we're surviving so far. It doesn't help that Boss has gone on long leave, leaving us here to hold the fort. I'm usually happy when he's not around. You know what they say about the cat being away and all that... But I must say I've never been so desperate for him to come back to work, hee hee.
Anyways, since we got the day off for Eid this last Wednesday, Yummy Hubby and I went back to visit Nenek* B. We haven't seen her for a few months now, so the trip was long overdue. Nenek B lives with As, an Indonesian lady, who helps around the house and garden. In between running after Nenek B and her many chickens and turkeys and pottering about in the garden, As likes to sew. And I notice that she likes to sew one item in particular: Floor mats. Little rugs.

Everytime I visit, I usually buy one or two of these little rugs from her, so there's always one on display in my house. As gets scraps of fabric from the kampung's dressmaker, and turns them into these babies. I've always admired her work. I've noticed that over time she's become very good with details like colour.

Basically, a rug is made of many, many small pieces of scraps, each folded into a triangle-type shape, sort of like a prairie point. These little triangles are then arranged, slightly overlapping each other into rows on a fabric base.


Truly a work of art, don't you think?
* Nenek - Malay meaning grandmama.
Kampung - village.
It's still terrible at the office, but am happy to report that we're surviving so far. It doesn't help that Boss has gone on long leave, leaving us here to hold the fort. I'm usually happy when he's not around. You know what they say about the cat being away and all that... But I must say I've never been so desperate for him to come back to work, hee hee.
Anyways, since we got the day off for Eid this last Wednesday, Yummy Hubby and I went back to visit Nenek* B. We haven't seen her for a few months now, so the trip was long overdue. Nenek B lives with As, an Indonesian lady, who helps around the house and garden. In between running after Nenek B and her many chickens and turkeys and pottering about in the garden, As likes to sew. And I notice that she likes to sew one item in particular: Floor mats. Little rugs.

Everytime I visit, I usually buy one or two of these little rugs from her, so there's always one on display in my house. As gets scraps of fabric from the kampung's dressmaker, and turns them into these babies. I've always admired her work. I've noticed that over time she's become very good with details like colour.


You can just about make out the hand stitching at the back in the picture above.

Truly a work of art, don't you think?
* Nenek - Malay meaning grandmama.
Kampung - village.
07 November 2010
Home decor a.k.a Kitty-proofing
"The Office" a.k.a the sewing room is being redone. Nothing too major, we're just putting in a built-in wardrobe along one wall to hide all the junk. The room was just becoming too full of stuff. Not surprising really, as it serves also as a storage room and a study.
So anyway, in the process my sewing machine got (literally) buried under a pile of things, and I can't get within 2 yards of it it without rearranging half of the room.
In the meantime my blog is getting cold, so I'm going to show you a little something I made earlier. It's an easy way to give any corner of your home a new look. So here we go.
Take one chest of drawers from Ikea.

I use this chest to store our photo albums. Very practical, but a bit blah, don't you think? I figured it would also make a good two seater, so I got some plain white muslin and stuffing and made a nice two seater cushion. Like so:

A bit more comfortable, but still a bit bland. So then came the cover. A simple navy fabric, for a nice clean look.

We were quite happy with the result, until the kitties decided to make it their unofficial day bed. Because the cover is a navy and therefore very dark, the fur left behind by my sleepyheads became quite visible. I spent some weeks religiously brushing the seat before deciding enough was enough and that something had to be done about it. And like a lightbulb going off in my head I decided a little quilted seat cover would do the trick nicely. The result:

This little quilt is basically made up of Ohio Stars and Prairie points.
A close up:

The beauty about this seat cover is, now all I have to do is wash the little quilt as the need arises.
So satisfying!
Hope you had a good weekend everyone!
So anyway, in the process my sewing machine got (literally) buried under a pile of things, and I can't get within 2 yards of it it without rearranging half of the room.
In the meantime my blog is getting cold, so I'm going to show you a little something I made earlier. It's an easy way to give any corner of your home a new look. So here we go.
Take one chest of drawers from Ikea.

I use this chest to store our photo albums. Very practical, but a bit blah, don't you think? I figured it would also make a good two seater, so I got some plain white muslin and stuffing and made a nice two seater cushion. Like so:

A bit more comfortable, but still a bit bland. So then came the cover. A simple navy fabric, for a nice clean look.


This little quilt is basically made up of Ohio Stars and Prairie points.
A close up:

The beauty about this seat cover is, now all I have to do is wash the little quilt as the need arises.
So satisfying!
Hope you had a good weekend everyone!
31 October 2010
Scrappy Pinks
It's been a busy week.
At work (yes I do have a day job!) things are going CRAZEEEEEE so hobbies have had to take a back seat for a while. Having said that, I've still managed to do a little bit here and there. Even as little as 15 or 20 minutes a day of cutting or fiddling about with the sewing machine or hand stitching something or just taking out a charm pack and fantasizing what I could do with it, takes much of my mind off whatever it is that's bothering me at work.
I've started another project, but of course 15 minutes a day for a week is not going to give me enough material to show to you, so am going to show you another project I finished some time ago. I had ordered a scrap bag from a vendor off Craftzone Malaysia (link in my sidebar). When the package came I found most of the scraps were, coincidently I guess, pink. So I pulled out some of my own pink scraps and came up with enough to make a small coin quilt.
If you've never tried a stacked coins quilt, you MUST, because it's really really easy peasy. I know I keep saying I should do more tutorials for those of you just beginning to quilt... and I haven't! I will soon, I promise (taking fingers off keyboard to cross them now :-P). But anyways, if you look at the finished product I'm sure you'll figure how to make one, coz it's so EASY.
Some pictures now.
Here it is pieced and being quilted on my humble Singer.

Practicing my stipple:

Finished! And blowing on the washing line. I decided to add the blue fabric with little pink flowers to balance out what might otherwise be a too-pink finish.

Close up.

Quilt finishes at about 3 feet by 4 feet. Perfect size for a stroller quilt or playmat.
It's back to work for me tomorrow, *sigh*. Till the next time, hope you had a wonderful weekend.
25 October 2010
More Scrap Ideas!
I've been making boxes!! They're SO exciting and addictive.
These are made from scraps cut into 5 inch squares. Basically the outside will need 5 squares and the inside lining will also need 5 squares. I suppose you can make these from any size squares you like. I got the idea from a tutorial off the internet. I tried to find the tutorial before I posted this entry, so that I could link it to this post, but I couldn't find the exact one. But if you google 'fabric box tutorial' there are plenty of sites that you can refer to.

To help keep the boxes in shape you need to stuff the insides with cardboard or stiff paper. At first I thought that would be tricky to do, but it was actually quite easy! You can use any stiff paper for this, eg cereal boxes. For those of you who have just celebrated Eid, now you know what to do with all those festive cards you received. Quilters recycle - yay!
A close up:

You can see I did a row of hand stitching at the top, just to keep everything in place.
I'm going to use them to store my hexagon paper pieces, my hairclips, spools, receipts, bits, bobs etc etc.
They're so cute and easy, can't wait to make some more!
21 October 2010
Clothes Scraps
Remember the bag of clothes scraps I got from my friend Jane?
Well, I've been busy making stuff with them. I figured early on that I was too lazy to do anything too fussy, so the result is that most of it went into making cushion and pillow covers.
Here are some finished:

The black flowery one on the right was a simple one made for another colleague Irene, and she also got a matching case for her fav (read 'smelly') pillow (smelly pillow not in the picture, thank goodness). The grey one on the left caused me a bit of grief, because the fabric was very flimsy, and I had chosen to make a quilted cushion case with it, silly me. In the end it didn't turn out too bad I suppose, but at that time I couldn't wait to get it over and done with :-(
Not one of my faves I have to say, although Yummy Hubby likes it a lot - I guess it's a man's taste.
The next flowery blue one is my favourite so far:

I just looooove the ruffles! Thinking I'll be more making more like this from the larger scraps.
Now the next two are patched from smaller pieces of fabric. This fabric was also sort of gauzy, so I had to use interfacing and lining for the top. Surprisingly, it was very easy to work with and finish. The back of the covers were made from solid black fabric - also from Jane's scraps.

Not bad use from what would have been otherwise binned, don't you think?
Subscribe to:
Posts (Atom)