30 December 2012

December

This month has been about -

A bit of travelling:


A bit of work:

And a bit of play:


Some procrastinating:


A little recreational reading:


 Birthdays!


And of course, a little bit of sewing!


Wishing you a belated Merry Christmas, and happy holidays - muah!!

14 December 2012

A State of Mind

They say a cluttered desk is a cluttered mind.

So I'm wondering what my cutting table says about mine...

'Controlled' clutter?
It may look that I'm on to something there, but in fact I've no idea what I'm doing. Hopefully something will come out of it, or I'll just end up with another pile of little scraps. *sigh*

Wishing everyone an uncluttered Friday!

09 December 2012

What I've Been Up To

Would you know, it's December - already! I thought I'd check in, before I get too comfortable pretending that I've ceased to exist in blogland...

So what's been keeping me busy lately?

Well.....WORK, most of the time.

Then I finished my Meadow Friends boy quilt top:


You probably can't see it clear in the photo, but it's meant to be waves...

After that came more WORK. Grrrr.

Then I made a cute little card wallet, from this tutorial.


It was my first time with snap closures. I was so fascinated by them (or maybe I just liked the hammering bit) that I made another. I use one wallet for my business cards, and may use the other for my pen-drives.


I decided to slip stitch the sides, instead of sewing down them like in the tutorial, because it was a bit of a tight fit for my cards.


Then came WORK (is anybody else having a frantic time at the office?)

When things got tough I wound down by reading a really cute book:


Keeping me up into the wee hours of the morning.

And fnished another; not so cute book:


And all the while there was MORE WORK. Arrrrggghhhhhhh!

To de-stress, a couple of little pouches from leftover Meadow Friends fabric was in order:


They came along really quickly... I made them on two early mornings before work, while having my coffee.


I still have a fair bit of Meadow Friends left, maybe I'll make them into scrap bags. Anyone interested?

And finally, of course: more WORK. *sigh*

So there you go. Hope everyone's keeping well and not working too hard. More sewing hopefully soon.

17 November 2012

Strangeness - and Slow-and-Steady Sewing

I must say it's been a rather strange feeling week around here. We've had two public holidays this week, one on Tuesday and then another on Thursday. I was soooo looking forward to it, but I have to admit it's left me a little out of whack. Did anyone else feel like they had the Monday blues THREE times this week?

Thank goodness for the sewing room. A few hours at the sewing machine, and things are starting to feel normal again. And, as a bonus, I've got a couple of new potholders to show for it, heee!


Those who know me will know that I like the fast and furious type of creating. Crooked seams? Oh well. But, unconventionally, I took my time with these, painstakingly measuring every piece, trimming to size, and even, horrors of horrors - unpicking! A LOT of unpicking. Aaaand pressing seams open. I don't like to press seams open, because they involve more work and is hence out of line with the 'fast and furious' spirit. But I have to tell you, pressing seams open really does reduce bulk in the seams. I might even be tempted to do it more often!


Also I'm loving how my stars turned out. The points and edges match up much better than with my usual attempts. Then I experimented with the binding, binding one potholder by machine and the other by hand. The verdict? The one bound by hand wins by a mile, with a softer and more organic look and feel.

So I'm thinking (hoping?) that this taking-the-time type of sewing might just be pursued more often in the future.

These potholders are off to be gifted to a friend. She's recently found herself (as a result of being recently wed) in the position of having to cook dinner for a hungry man. Good luck dear, you'll be needing it ;-)

11 November 2012

Lest We Forget

A quickie post, to mark an important date.


To take a step back and reflect on our history.

To take a moment to be grateful for the big things and the little things that we are able to enjoy today.

To learn from past mistakes, and to say a prayer for those still caught in strife.

Happy Remembrance Day.

Well wishes also for the coming week : Happy Deepavali to my Hindu friends, and Happy New Year to all Moslem readers. To everyone else here in Malaysia - Happy holidays, huhu!!!

08 November 2012

Irresistable

I know I have quilt tops to quilt, that I really shouldn't be adding more to the UFO pile, but I just couldn't resist cutting into these:


Aren't they cute? Meadow Friends for boys prints that have been calling and calling out to me from my fabric shelves. I've chosen my pattern, and taken the rotary cutter to them. A quilt top to show for my efforts coming soon!

On top of that I've added another finished quilt top to the 'To Quilt' pile:


These hexagons have been a LONG time coming. But the recent rainy weather certainly sped things along. Rainy nights = lots of applique. And you can probably tell from the picture : Rainy days = difficult light = crappy photos, ehehe.

I'm sooo tempted to hand quilt this one - but am a little worried that it might be months yet before we see it finished. Having said that, there really isn't a deadline for this, so we'll see.

Until the next time, happy sewing!

04 November 2012

Cupcake in a Corner

Hello and happy November everyone! Doesn't time just fly?

I'm finally able to share my finish - hip hip hurray. A scrappy patchwork quilt - no fuss!


Such a joy to make, this one. After much thought, I backed it with a purple butterfly print, which a colleague from the office kindly gifted me some time ago.


Simply quilted in-the-ditch, and bound with a black polka dot print, which I think frames the quilt beautifully. It measures 40" X 50", so is a generously sized baby quilt, but works beautifully as a lap quilt for those rainy TV nights (something we're getting a LOT of lately in this part of the world).

I'm having fun playing 'I spy' with the prints : baby strawberry shortcake...


Some Japanese zakka, err, stuff...


 Oranges (and lemons)...


Even a hidden princess...


Postage stamps...


And of course the cupcake in the corner...


Love!


Have a happy November!


28 October 2012

Time To Quilt?

I think so.

You see, I was prepping for quilting my patchwork quilt top, and then found another top that needed quilting. Five minutes later I found another. So now I have not one but three I have to think about quilting - yikes.


Needless to say I immediately stopped digging into the back of the cupboard: I have a sneaky feeling that I might find more...

For the moment, I'll just concentrate on these three pretties.


I just need to decide which one to tackle first.

Happy sewing!

25 October 2012

Finally A Finish

Am done with my patchwork quilt top, hip hip hurray!


I couldn't get anyone to model it for me though... hmm, so I draped it across a couple of shelving units.

A closer look...

And a leeetle bit closer...

Next stop : Quilting!

Hope everyone's having a happy week. To those in Malaysia, enjoy the long weekend!

20 October 2012

Eye-glass Case : Tutorial

I realise I've been going on a bit about eye-glass cases lately... but there seems to have been rather a demand for them - at least in my part of the world.

I had to sit down to make one for mum this afternoon - she wasn't fooled about the fabric boxes from this post, heheh. So while I was at it I thought I may as well make another spare. You know,  just in case. And while I was making the spare I thought I may as well record the process to share. (Apologies in advance for the picture heavy post!)

So, here's my version of the eye-glass case:

First up you need 2 sets of fabric: the Front and the Back. 

For the Front cut a 3.5" X 8" piece from each of your exterior fabric, lining fabric and some batting.
For the Back, cut a 6.5" X 8" piece from each of the exterior fabric, lining fabric and some batting.

I'm using a velcro closure so you'll need a length of velcro also, about 2 inches (sorry, I forgot to include the velcro in the photo).

(Note : there's a bit of scrap fabric too on the top left of the picture, which I'm going to use to make a decorative bow for my case. You won't need this extra fabric if you're making a plain case.)

Starting with the Front, take your exterior fabric and line it up with the batting and lining like this:


The lining and exterior fabrics should be right sides together.

Sew all layers of the Front sandwich along one long edge:


Flip the exterior fabric over and sew one length of velcro in the centre on the right side, about 1/2 inch from the sewn (top) edge:


Flip the exterior back  over the other 2 layers (the batting will now be in between the exterior and lining fabrics) and top stitch the edge of the top through all layers:


Now we can bring in the Back.

Place your (finished) Front sandwich right side up on the Back lining and batting, like this:


Line everything up nicely and sew very close to the edge on both edges. This is just to keep everything in place so that it doesn't shift during the next steps.


Now you can sew on the other piece of velcro on the lining of the Back, like in the next picture. Sew about 1/2 inch from the top edge.


Now we can put everything together, huhu! Take your Back exterior fabric and lay it right side down over the entire piece, like this:


Make sure all layers are nicely lined up. 

Now, I wanted my flap to have a rounded edge, so I marked out the curves at this stage, using a spray can as a guide, like this:


Next sew along the entire thing about 1/4 inch from the edge, leaving about a 2-3" gap (for turning) at the top of the flap. Trim off excess fabric and batting, and clip the corners.


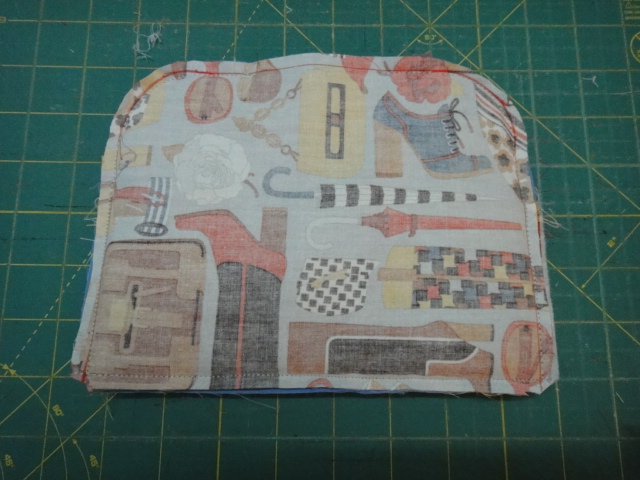
Turn the entire thing over through the gap at the top:


And you should end up with something like this next photo - yippee!


Almost finished now!!!  Top stitch close to the edge along the entire flap, sewing over the gap, anddddd........


we're finished! You will now have a cute little eye-glass case!


Ok, the next step is purely optional, if you want a decorative bow. Cut 2 rectangles from your scrap piece of fabric measuring 3" X 4" (Bow) and 2" X 3" (Band) respectively. Sew along the edges as marked in the photo below, leaving a small gap on the Bow piece for turning:


Turn both pieces inside out, and sew the gap on the Bow piece closed. You will end up with two pieces that look like this:


Wrap the Band around the middle of the Bow, trimming off excess length, then attach to the front of the flap of your eyeglass case. You can hand-sew this step, but I was lazy and squeezed everything under my machine's needle.


Now all you have left to do is step back and admire your handiwork, heee!


Hope everyone's having a great weekend!