Showing posts with label Tutorial. Show all posts

20 October 2012

Eye-glass Case : Tutorial

I realise I've been going on a bit about eye-glass cases lately... but there seems to have been rather a demand for them - at least in my part of the world.

I had to sit down to make one for mum this afternoon - she wasn't fooled about the fabric boxes from this post, heheh. So while I was at it I thought I may as well make another spare. You know,  just in case. And while I was making the spare I thought I may as well record the process to share. (Apologies in advance for the picture heavy post!)

So, here's my version of the eye-glass case:

First up you need 2 sets of fabric: the Front and the Back. 

For the Front cut a 3.5" X 8" piece from each of your exterior fabric, lining fabric and some batting.
For the Back, cut a 6.5" X 8" piece from each of the exterior fabric, lining fabric and some batting.

I'm using a velcro closure so you'll need a length of velcro also, about 2 inches (sorry, I forgot to include the velcro in the photo).

(Note : there's a bit of scrap fabric too on the top left of the picture, which I'm going to use to make a decorative bow for my case. You won't need this extra fabric if you're making a plain case.)

Starting with the Front, take your exterior fabric and line it up with the batting and lining like this:


The lining and exterior fabrics should be right sides together.

Sew all layers of the Front sandwich along one long edge:


Flip the exterior fabric over and sew one length of velcro in the centre on the right side, about 1/2 inch from the sewn (top) edge:


Flip the exterior back  over the other 2 layers (the batting will now be in between the exterior and lining fabrics) and top stitch the edge of the top through all layers:


Now we can bring in the Back.

Place your (finished) Front sandwich right side up on the Back lining and batting, like this:


Line everything up nicely and sew very close to the edge on both edges. This is just to keep everything in place so that it doesn't shift during the next steps.


Now you can sew on the other piece of velcro on the lining of the Back, like in the next picture. Sew about 1/2 inch from the top edge.


Now we can put everything together, huhu! Take your Back exterior fabric and lay it right side down over the entire piece, like this:


Make sure all layers are nicely lined up. 

Now, I wanted my flap to have a rounded edge, so I marked out the curves at this stage, using a spray can as a guide, like this:


Next sew along the entire thing about 1/4 inch from the edge, leaving about a 2-3" gap (for turning) at the top of the flap. Trim off excess fabric and batting, and clip the corners.
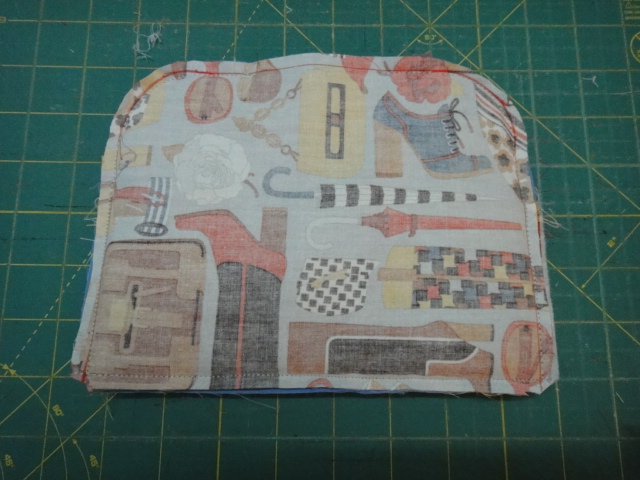

Turn the entire thing over through the gap at the top:


And you should end up with something like this next photo - yippee!


Almost finished now!!!  Top stitch close to the edge along the entire flap, sewing over the gap, anddddd........


we're finished! You will now have a cute little eye-glass case!


Ok, the next step is purely optional, if you want a decorative bow. Cut 2 rectangles from your scrap piece of fabric measuring 3" X 4" (Bow) and 2" X 3" (Band) respectively. Sew along the edges as marked in the photo below, leaving a small gap on the Bow piece for turning:


Turn both pieces inside out, and sew the gap on the Bow piece closed. You will end up with two pieces that look like this:


Wrap the Band around the middle of the Bow, trimming off excess length, then attach to the front of the flap of your eyeglass case. You can hand-sew this step, but I was lazy and squeezed everything under my machine's needle.


Now all you have left to do is step back and admire your handiwork, heee!


Hope everyone's having a great weekend!


17 March 2011

Prayer Quilt - Pattern

You know how I've said that I'll be posting more tutorials on my blog? Well if you do, you'll also know that I haven't really been keeping my word on this, shame on me. 


Truth be told, there're so many other talented individuals out there that I'm often rendered a little intimidated to tutor anyone on anything, especially as I'm not much more than a beginner myself.


But promises are never made to be broken, so in this post I'd like to share a pattern. It's not so  much a tutorial, but I hope there's enough material for you to follow. This is the pattern for my Prayer Quilt, you can see a link to my post on it here.


This prayer quilt is a perfect little rug for reflecting upon in (inreasingly rare) quiet moments.

Note, I've never written a pattern before so please excuse any shortcomings. I'm not very precise - I know, I know, precision is key in quilting - but I normally just eyeball my way along. Also, the illustrations are just sketches, but I hope they're clear enough to understand.

So here we go!

Ingredients:
  • 1 charm pack
  • ¾ yard coordinating fabric for background
  • ¼ yard binding fabric
  • 1 yard backing fabric

 Cutting:


1. Centre Block - Choose 9 charms and set aside.
2. Medium Blocks - Choose 4 charms and set aside.  
(Centre and Medium blocks are highlighted in pink in the illustrative diagram below)
3. Small Blocks - Choose 4 charms and quarter each into 4 smaller squares of 2.5” X 2.5”.
(Blue in the diagrams)
4. Triangle border -
• Take 10 charms and cut once on the diagonal. Be careful not to stretch on the bias.
• Take another charm and cut twice down the diagonal, to yield four small triangles. These will be the corner triangles.
(Half square triangles are red in the diagram, quarter square triangles - yellow)  


5. From background fabric cut:

• 16 - 5” X 5” squares.

 • 2 – 14” X 5” rectangles (referred to as "A" in diagrams).

 • 4 – 9.5 X 5” rectangles (referred to as "B" in diagrams).

 • 16 – 3” X 5” rectangles.

 • 16 – 3” X 2.5” (small rectangles)


Construction
1. Take 1 of the small 2.5” X 2.5” squares and sew onto one 3” X 2.5” small rectangle.

2. Repeat for all 16 small squares and 16 small rectangles. 

3. Attach each pieced unit from step 2 to the 3” X 5” rectangle on the 5” edge. Repeat until you have 16 blocks that look like this:


 4. Referring to the diagram below, piece the prepared blocks into rows.


 5. Then sew each row together, like so:


6. For my Prayer Quilt I had charms left over from my charm pack, so I pieced some of these together into 2 rows, which I then attached to the (short) ends of the quilt to add some length. You can see this in the photo of the finished quilt. There's no rocket science there, you can piece them however you want, I did mine in rows of 2.5" squares.

7. Finally, you're ready to layer, quilt and bind.

And that's all there is to it! If you do give this a go, let me know, I'd love to see some photos.


22 November 2010

Coasters

As I sew I have a habit of chucking small bits and pieces of leftover fabric into a box. (It's sooo difficult to throw them away isn't it?) Well, the box will inevitably overflow at some point, so once in a while I go through it and try to make something out of the contents.

This time I came up with coasters. I got the idea at the office one day. I was trying hard to concentrate on work, but got constantly distracted by a sticky ring on my desk from where my coffee cup had been the previous day.

These coasters are really simple to make. Which is really great, given my schedule these days. All you need is two squares, 4" or 5" squares work wonderfully, and one square of batting.


So what you do is place the front and back pieces together (with right sides facing) on top of the square of batting. Like in the (blurry) photo below.

 Line everything up and  stitch with a 1/4 inch seam allowance along the edge, leaving about a 2 inch gap (for turning) between your starting point and stopping point. Trim away excess batting and trim the corners to reduce bulk.


Using the opening you left earlier, turn everything inside out. Quilt as desired. Don't forget to quilt over the gap to close it. I used simple straight line quilting in my coaster here.


You can also make them out of smaller pieces of scraps, like I did. Just piece enough of them together to get the desired (4" or 5" square) size, and repeating the steps above.


I love just mixing the fabric and colour randomly. That way when you flip the coaster over it's like you get a totally new one!


These babies are going to the office with me. Let's see if I can make enough for my colleagues too.

Wishing you a good week ahead!

02 August 2010

Tutorial - Half Square Triangles

Since I started this blog I've had a few questions from friends on how a quilt is put together. While I try my best to explain, it's a bit difficult without actually demonstrating how it works.

Now don't get me wrong, I'm certain that most people who come across this blog are already experts at piecing, and definitely don't need this tutorial at all. This is for the beginners, or those who think they might be (even just a little bit) interested. Read on, I hope you catch the quilting bug!


Right then, for Half Square Triangles:

First, cut 2 squares, each of a different fabric. Note there should be some contrast to the 2 fabric. The squares can be any size, I've made mine 4 inches X 4 inches.


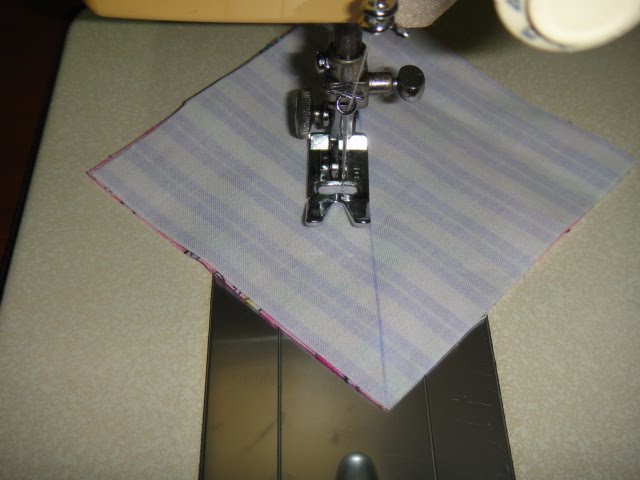
Secondly, take a pencil and a ruler, and draw a line diagonally down the wrong side (ie the back side) of one of the squares. I normally do this on the lighter fabric.


Next, align the squares right sides together. Remember now, make sure the right sides of each fabric face together. Just like in the next photo:


Now you need your sewing machine. Or I suppose you can do this by hand also. Stitch down either side of the pencil line you drew earlier, with a 1/4 inch seam allowance. That means the distance between the pencil line and the stitching line is 1/4 inch. Don't forget to sew on both sides of the pencil line.


How's everyone doing so far? Eaaaasy isn't it? Ok, just a bit more to go. Next get your scissors, and snip right down the middle of the fabric, along the pencil line you drew earlier.


Now you can open up your square, press along the sewing line and...


Congratulations!!! You have a couple of half square triangles :)


Now go make your own, quick!